
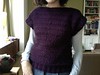
But this was different - I was inspired so, without further ado: the November Sweater!
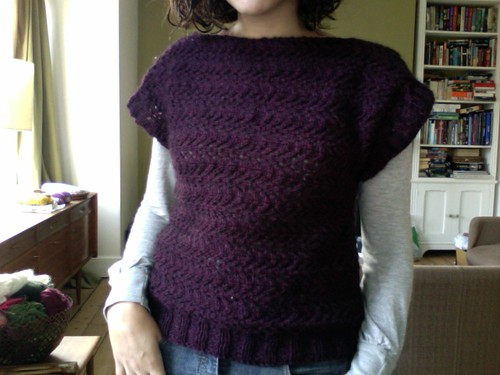
Now, as you might expect, this is not the most complex of patterns. What happened was, I was on my usual trawl through the charity shops of Ealing, looking for knitwear I could unravel and knit into something else, when I spotted a dark purple-y sweater that was a bit tired, but that I was sure I could breathe new life into. The original stitch was quite lacy (how I wish I had taken a photo of it in its original form!) but fairly easy to take apart. While undoing all those machine-made stitches, I thought about what to re-knit it into. Having seen a few cap-sleeved sweaters out there recently, that's what immediately sprang to mind. I thought a smaller, more defined lace pattern than what the original sweater had would also work.
So, I borrowed the lace stitch from the ever-popular February Lady Sweater, which, in turn, had borrowed from Elizabeth Zimmermann's Baby Sweater on Two Needles. I drew out what I hoped it would look like (excuse my extremely poor drawing skills):

It was basically just a basic T shape - the sweater would be worked in 2 pieces: front and back, and side to side so that the lace pattern would be horizontal in stead of vertical. There are no increases, no decreases, and probably the most advanced technique used was picking up stitches around the bottom of the sweater to add ribbing.
Now, not that it is necessarily required that I actually write out a pattern this unbelievably simple, here it is, posted more because of my little, private happiness at having done this on my own than for any assumption that anyone couldn't have figured this out themselves!
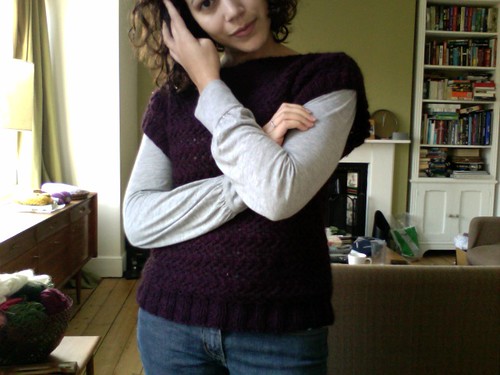
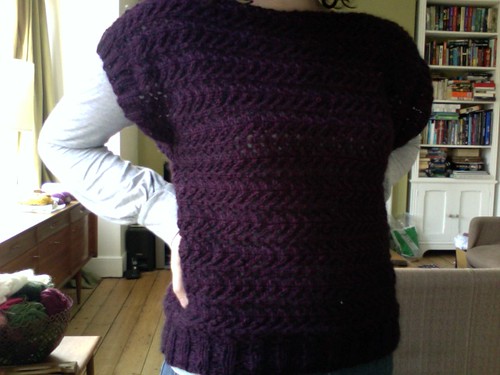
(Excuse the messy house behind me!)
November Sweater
Materials:
- A short-sleeved sweater's worth of approximately DK weight yarn (find an old sweater in your local charity shop or thrift store)
- One 26" 5 mm / US 9 circular needle
- One stitch marker
Lace Stitch Pattern:
Row 1: k1, k2tog, yo, k1, yo, ssk, k1
Rows 2 & 4: purl
Row 3: k2tog, yo, k3, yo, ssk
Instructions:
Front
Cast on 42 stitches.
Row 1: k2p2 - repeat to end of row
Row 2" p2k2 - repeat to end of row
Repeat rows 1 and 2 3 more times
Begin lace pattern.
Repeat lace pattern, rows 1 - 4 twice.
Cast on an additional 42 stitches.
Continue in lace pattern for 18" ending with a right side row. (Or width necessary for individual fit)
On wrong side row, bind off 42 stitches, leaving 42 stitches remaining.
Continue in lace pattern for two repeats.
Change to k2p2 ribbing for 8 rows.
Bind off all stitches.
Repeat exactly for back.
Seam sides of front and back together. Seam shoulders 5" in from end of sleeves.
Ribbing
With front and back sewn together, and starting from a side seam, pick up and knit 116 stitches evenly around the bottom of the sweater. Continue in k2p2 rib around for 2.5".
Bind off using Jeny's Surprisingly Stretchy bind off from Knitty - this is really necessary for actually being able to get the thing over your head!
Weave in ends, and voila! I "designed" a sweater.
Now it is entirely possible that there are mistakes in the above, and also that there a million better ways to achieve the finished product - but I do like the way it turned out.
Also, I apologise that I haven't actually worked out different sizes (as written, it works on a size 10 UK or 6 US). Clearly I am not yet that talented. One day...
And: the project on Ravelry.
____________________________________
Listening to: Alela Diane


10 comments:
Nicely done, I LOVE it! Can't wait to make my own.
I just need to figure out how to unravel sweaters without cutting through the rows... I'll work on that :)
Thank you so much! Unraveling sweaters is kind of therapeutic. I'll have to do a post on unravelling - I have a few tricks :)
oooh, that would be wonderful!
This is a fab sweater! Thank you so much for offering the pattern for free! Love it!!!
It's a beautiful sweater. Congrats! I was wondering though, how long yours is and how many stitches you cast on to achieve the length?
I love this! And I have the perfect yarn for it too. Thank you!
Hi Kim,
Agh - looks like when I first posted this I forgot to fill in my "XX"! Sorry about that. :) I actually cast on an additional 42 stitches, to get an 18" length, plus 2 more inches once you add the ribbing. Thanks for pointing out my omission!
Meghan
Thanks so much! I was genuinely curious because I think the length is perfect on you. Now I will be looking for some yarn to make this.
So cute! And I love that you made it from recycled yarn. I've done it a few times, but it's sometimes hard to make something exciting from tired yarn. It seems like you pulled it off with cute to spare. :)
Cheers!
Daisy
I do not understand. Is this worked from side to side or bottom up? I need a large. When casting on the amount you say, it doesn't look like it would go around a worm so I think I am not understanding. Then I see the message that we should add 42 sts to the cast on amount. I am so confused and I want to make this really bad. I have tried for two days to figure it out. So do you cast on 42 sts or 82 sts. I so very seldom find anything I like for myself. Could you please reply to horsebarn405@cox.net as I am afraid I want see the answer.
Helen
Post a Comment