Thursday 24 December 2009

Merry Christmas.

DSCF4179

For all your oh-my-god-i-forgot-to-buy-wrapping-paper-wrap-presents-and-it's-christmas-eve needs: A tutorial I found via this very lovely blog.

Happy Christmas :)

Wednesday 23 December 2009

Over the river and through the woods...

Okay, so more "across the pond" or even really, well, across the Atlantic Ocean for that matter. We're off to the western hemisphere tomorrow and I wanted to be prepared.

DSCF4189

See, travelling to and from the US and the UK is a bit of a hassle for us because we have 3 passports and one visa between us. (The Australian carries Australian - duh - and British passports and I have American citizenship and a UK visa.) All this requires us to carry an ungodly amount of identification with us when we travel. Seeing as how immigration procedures make me nauseous, and I have a panic attack at least five times in any given journey thinking I have dropped or lost something, I decided this time I wanted all of our docs super-safe.

DSCF4190

Of course, I didn't decide this until today (flight's tomorrow - gah!). So I felt the need to whip something up myself. Basing the design on this very cute tutorial, I improvised a bit and added an extra bit of security so that nothing can fall or slide out. I also made it so that it can accommodate "his and her" documents. One other modification I made was to add a few sheets of newspaper as a lining so that it's a bit sturdier.

So I think it came out ok for a last-minute project that took less than an hour. I might make some more of these in the future - I can see using quilting techniques - and hey, maybe even cutting in a straight line next time so it doesn't come out quite so wonky ;)


Tuesday 22 December 2009

Staying cosy.

DSCF4148

On one of my parents' visits to London, my mom got it in her head that we must visit the Tea Museum. Now not many people have heard of this particular institution, not even most Londoners. Let's say that at the time, it was an underwhelming experience. Luckily it looks like they are closed for refurbishment, which can only mean good things, right? Actually I am pretty interested in how certain objects or items can hold a whole lot of social history within them, and tea is no exception, so maybe a re-visit will be in order one day.

My mom however left the museum empty handed, even though I am pretty sure she was hoping to come away with a lovely teapot. So for Christmas this year, I decided to get her one - from a shop that sells English-made pots in Covent Garden. And what teapot worth it's Marks and Spencer Fairtrade Gold doesn't deserve to be cosy?

DSCF4160

I used this Tea Mitten by Elisabeth Kleven from Ravelry and based mine on another raveler's version which incorporated the smocking. I am pretty pleased with the result - and hopefully mom will too. (Don't worry, I'm not giving any surprises away as she doesn't read the blog!)

DSCF4154

Monday 21 December 2009

Last Minute Gifts.

I caught the embroidery bug from a friend, who made an amazing Lung Tie for her pulmonologist dad.

Thinking of something I could throw in alongside small gifts for some girlfriends, I first thought "tea towels" but when I couldn't find plain tea towels worth embroidering, I picked up a set of 3 handkerchiefs instead. Here are the finished products:

DSCF4161

They are actually a bit more cute-sy than I might have preferred, but hey, they are still cute! This was my first "real" attempt at embroidery, I and I don't think they're too bad!

This is the first one I did, and probably my favourite:

DSCF4162

It's design is from a set of transfers from Sublime Stitching. As I'm in the UK, I picked mine up at the cool store Tatty Devine. (They had a very limited stock at the Covent Garden store.)

WAIT: Just discovered you can download designs from Sublime Stitching by registering on their website - then print! I so wish I had discovered this sooner!

DSCF4166

The next one I did was this owl - the design for which I found on this illustrator's website. With this one, I printed it out and then used my husband's lightbox (hooray for being married to a graphic designer!) to trace out the design in pencil onto the hanky.

DSCF4156

I did the same for the last one: a slightly wonky matryoshka doll based on this project on cutoutandkeep.net.

DSCF4167

All in all, not a bad start on embroidery I think! I hope the recipients will enjoy them - at least I've got them other things to go alongside these just in case ;) I think there is a lot more embroidery in my future - especially now I've discovered those downloadable patterns!

Now off to go and ogle all the snow falling outside the window (again!).

London snow.

While back on my original home of the east coast of the USA they are being inundated with snow, here in London we've just had a light dusting (although a wet snow is currently falling outside my window).

I walked through the local park yesterday morning and captured this scene on my camera:

DSCF4135

As I have yet to leave the house today (not wanting to have cold feet and all) I have been contenting myself with mugs of hot chocolate and some last minute Christmas crafting.

Friday 11 December 2009

Potential.

DSCF4128

I recently received a truly lovely and unexpected gift. It got me thinking about skeins of yet-to-be-used yarn.

There it is, all bound up, the colours beautifully arranged - twisted, wound, tucked. When I look at a skein of yarn, I get excited - what could I do with it? A new skein means researching patterns on Ravelry, thinking if I could make something up myself, wondering if it should be gloves, a cardigan, a brooch. A skein has so much potential.

That reminds me of a quote that I love, but that's a little bit scary too:

If I were to wish for anything, I should not wish for wealth and power, but for the passionate sense of potential - for the eye which, ever young and ardent, sees the possible. Pleasure disappoints; possibility never.
-Soren Kierkegaard
It's true, I often enjoy the looking forward, or the getting excited about something, more than the end result. Do you enjoy wearing your knitted garments as much as you enjoy knitting them?

I looked up the word potential in the Oxford English Dictionary:

Potential

A. adj.

1. Possible as opposed to actual; having or showing the capacity to develop into something in the future; latent; prospective.

B. n.

2. Something which is possible, as opposed to actual; capacity for growth, achievement, future development or use; resources able to be used or developed.

and then potent:
Potent
A. adj.1
1. a. Of a person or thing: powerful; having great authority or influence; mighty. Now chiefly in literary usage.
2. Of a drug, alcoholic drink, etc.: causing physical effects; causing rapid intoxication; strong.
Interesting. I know that gorgeous skeins of yet-to-be-used yarn do tend to have intoxicating effects on knitters - anyone who's been to a fiber show has witnessed that. As for "of a drug, alcoholic drink, etc" - there's a reason why knitter's call their collection of yarn their "stash" after all.

DSCF4123

Right now I now have a lot of "potential". And so far Kierkegaard's right - possibility doesn't disappoint.

Wednesday 9 December 2009

How to: the Anthro Ruffled Scarf.

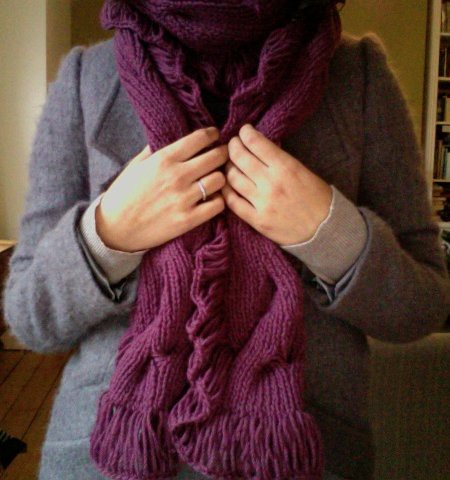
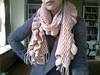
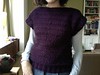
I am so happy about the response I have gotten from fellow Ravelers on my Anthropologie-inspired scarf! There have been a few requests for my notes on how I did it, and so I thought I'd write it all out here for you. If you decide to knit the scarf, there is also now a pattern page for it on Ravelry here: Anthropologie-Inspired Ruffled Scarf.

Photo 3

Anthropologie-Inspired Ruffled Scarf

Materials:
  • Approximately 4 skeins of Cascade 220 (100% Peruvian Highland Wool/Worsted/10 ply/220yds/201m per skein)
  • One set of 5.5 mm knitting needles
  • Cable needle
  • One 5.5 mm crochet hook
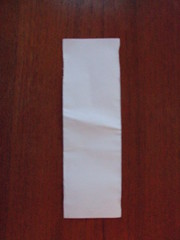
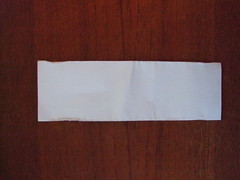
  • A sheet of paper folded over itself width-wise to create a 2.5" strip
  • Tapestry needle
Gauge: 25 st and 20 rows = 4" in k1, p1 ribbing

Finished Measurements:
  • Scarf without crochet border: 87" x 5"
  • Scarf with crochet border: 89" x 9"
Pattern notes:

C10F = Slip 10 stitches to cable needle, hold cable needle in front, work 10 stitches in (k1, p1) ribbing, work 10 stitches from cable needle in (k1, p1) ribbing

C10B = Slip 10 stitches to cable needle, hold cable needle in back, work 10 stitches in (k1, p1) ribbing, work 10 stitches from cable needle in (k1, p1) ribbing

Main Knitted Scarf Instructions:

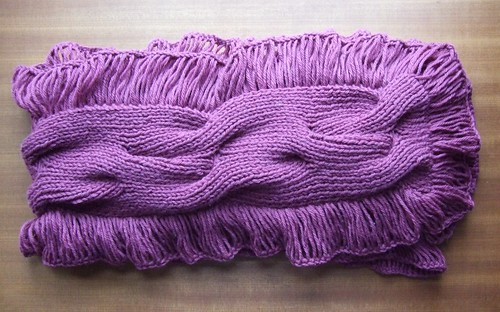
The scarf is worked in a 1x1 rib with a garter stitch border on either side. Cables appear every 15 rows. The border is worked in broomstick crochet, without twisting the loops. More detailed information below.

With 5.5 mm needles, cast on 44 stitches (I like a tubular cast on).

Row 1: slip 1, k1, (k1, p1) to last 2 stitches, k2

Repeat this row 9 times more for a total of 10 rows.

*Cable row 1: slip 1, k1, (C10F) twice, k2

Repeat row 1 14 times

Cable row 2: sl1, k1, work 10 stitches in (k1, p1) ribbing, C10B, work 10 stitches in (k1, p1) ribbing, k2

Repeat row 1 14 times.*

Work from * to * 9 times

Repeat Cable Row 1

Repeat Row 1 14 times

Repeat Cable Row 2

Repeat Row 1 10 times

Bind off.


Crochet Ruffle Border Instructions:

If you haven't done broomstick crochet before, I suggest that you check out any of the youtube videos that give a visualisation of how to do it. It is really easy, but not unless someone shows you how it's done first. You may notice that the loops are twisted together in these videos, however in this version, you will not twist the loops. You may also notice that in these videos, crocheters often use something to hold the loops as they go around. I just used a strip of folded paper, described below.

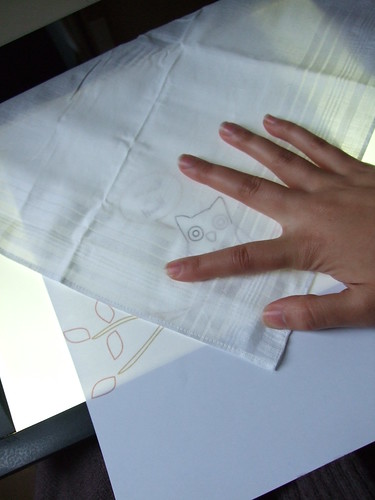
Take a sheet of A4 or letter-sized paper and fold it width-wise to create a 2.5" wide strip - you will use this to place the crochet loops on to create uniform-sized loops as you go around. Don't worry when there isn't enough space on the strip to hold the loops you are creating; once they start falling off the end of the strip, they will stay uniform in size. You just need to keep the most recent loops on the strip so they don't pull and change in size. You could use a ruler or a piece of cardboard of the same size if you like.

DSCF4036

With 5.5 mm crochet hook,start at one corner of the scarf (it doesn't matter which side of the scarf you work from, as it is reversible). Insert the hook into a knit border stitch and draw up a loop. Place the loop on the strip (the strip should be turned horizontally now, as in the photo below.

DSCF4033

Continue around the scarf, drawing up a loop for each knitted stitch along the short edge of the scarf, and along each row of the long edge of the scarf, placing the loops on the strip, and moving the strip along as you go. Once you have drawn up these loops around the edges of the entire scarf, single crochet at the top of each loop all the way around. Do not twist the loops. This will secure all the loops together around the scarf. Try to lay the scarf out completely flat as you do this, so that the single crochet stitches are all in approximately the same place on each loop. You will also want to watch out that you don't miss any loops as they can sometimes get lost - check both sides of the scarf every now and then to make sure you haven't missed any. Once you have single crocheted around the scarf in each loop, slip stitch to join the last stitch made to the first stitch. Fasten off and weave in ends.

DSCF4025

Okay, so I think that's it! If you find any mistakes in the pattern (especially as I wrote it down from memory, rather than as I knit it), please feel free to let me know!

DSCF4028